
You Can Get Everything Right and Still Come Home with Soft Photos
I still remember my early attempts at astrophotography.
The Milky Way was visible. The sky was clear. The foreground looked great. I checked the image on the back of the camera and everything seemed fine.
Then I got home.
Zoomed in.
Nothing was sharp.
The stars looked slightly bloated. The foreground was soft. The image wasn’t unusable, but it certainly wasn’t what I had imagined.
Sound familiar?
Most astrophotographers struggle with focus at some point. Not because they don’t understand their camera, but because focusing in the dark is genuinely one of the hardest parts of night photography.
Why Autofocus Usually Fails at Night
During the day, autofocus has plenty of contrast to work with.
A tree edge.
A mountain ridge.
A person’s face.
At night, those reference points disappear.
The camera starts hunting back and forth looking for contrast that simply isn’t there.
Even modern cameras with excellent autofocus systems can struggle under a dark sky.
I’ve seen photographers spend thousands on the latest camera body only to discover that autofocus still can’t reliably lock onto a dim star.
That’s because astrophotography pushes autofocus beyond what it was designed to do.
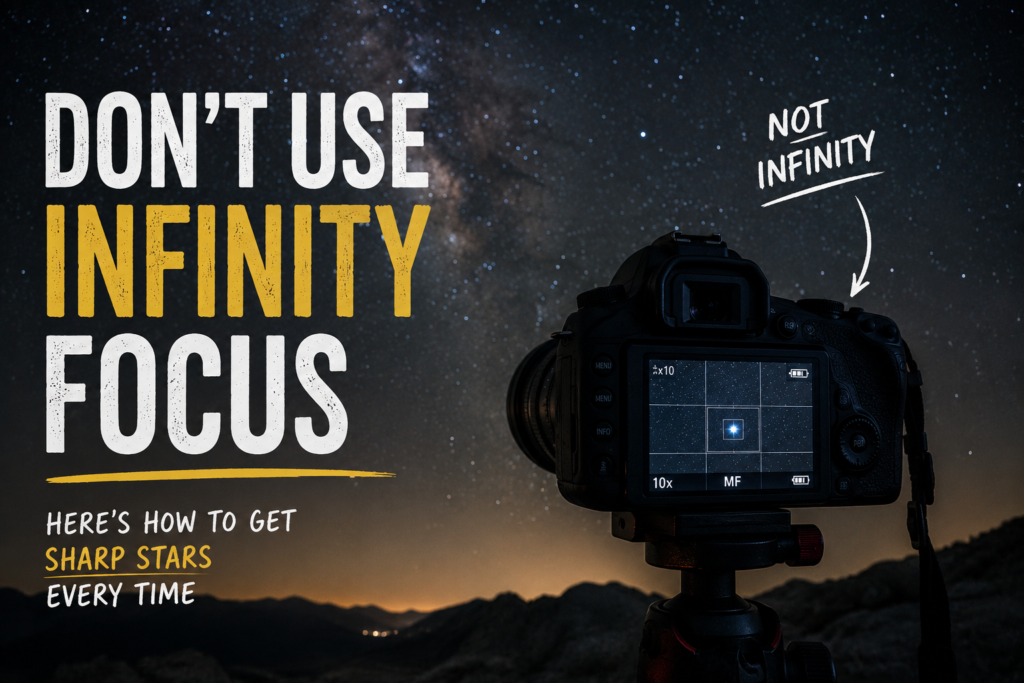
The Biggest Mistake Photographers Make
Many photographers believe the solution is simple.
Turn the lens to infinity.
Problem solved.
Unfortunately, it rarely is.
Look closely at most lenses and you’ll notice the infinity mark is often not exactly where true infinity focus sits.
Temperature changes, manufacturing tolerances, and lens design all play a part.
I’ve seen lenses achieve perfect star focus slightly before infinity and others slightly beyond it.
Trusting the infinity mark blindly is often the reason stars end up looking soft.
My Preferred Method for Sharp Stars
After years of shooting night skies, I’ve found the most reliable method is surprisingly simple.
Step 1: Find the Brightest Star Available
Venus works brilliantly.
Jupiter is excellent.
A bright star near the horizon can also work well.
The brighter the target, the easier the process becomes.
Step 2: Use Live View
Switch to Live View and magnify the image.
I normally zoom in to the maximum available magnification.
At first the star may look like a fuzzy blob.
That’s completely normal.
Step 3: Switch to Manual Focus
Now slowly rotate the focus ring.
Very slowly.
Watch the star carefully.
As focus improves, the blob becomes smaller and more defined.
The goal is simple.
Make the star as small as possible.
Not brighter.
Not larger.
Smaller.
When you reach perfect focus, the star becomes a tiny pinpoint of light.
Step 4: Don’t Touch the Lens Again
This sounds obvious.
Yet many photographers accidentally bump the focus ring while repositioning the camera.
I know because I’ve done it myself.
More than once.
If your lens has a focus lock switch, use it.
Otherwise, get into the habit of checking focus periodically throughout the night.
Why Wide Apertures Make Focusing Harder
Most astrophotographers shoot between f/1.4 and f/2.8.
That’s great for gathering light.
The downside is that depth of field becomes incredibly thin.
A tiny movement of the focus ring can shift stars from tack sharp to noticeably soft.
When shooting at f/1.4, precision matters.
Far more than many photographers realise.
The Bahtinov Mask Secret
If you’re serious about astrophotography, a Bahtinov mask is one of the cheapest upgrades you can make.
It fits over the front of your lens or telescope and creates a diffraction pattern around bright stars.
When the pattern lines up perfectly, focus is perfect.
There is no guessing.
No squinting at the LCD.
No wondering whether you’re close enough.
Many deep sky photographers won’t shoot without one.
Don’t Trust the Rear Screen
This is probably the hardest lesson to learn.
The photo often looks sharp on the camera screen.
Especially in the dark.
Especially when you’re tired.
Especially at 2am.
The rear screen is simply too small to judge critical focus accurately.
Always zoom into a captured frame and inspect the stars carefully.
It takes ten seconds.
It can save an entire night’s shoot.
Focus Is More Important Than Noise
Photographers spend a lot of time worrying about:
- ISO
- Noise reduction
- Star trackers
- New lenses
- Editing software
Yet a perfectly focused image with a little noise will always look better than a noisy image that’s out of focus.
You can reduce noise later.
You cannot recover detail that was never sharp in the first place.
Final Thoughts
Astrophotography is often described as a battle against darkness.
I don’t think that’s true.
The darkness is actually the easy part.
The real challenge is finding precise focus when your eyes, your camera, and the night sky are all working against you.
Once you learn how to focus confidently in the dark, everything changes.
Your stars become sharper.
Your foregrounds become cleaner.
And suddenly all those hours spent under the night sky start producing the images you imagined when you first looked up.
Because in astrophotography, focus isn’t just another setting.
It’s the foundation that every great night sky image is built on.
Quick Takeaway
If you’re struggling with astrophotography focus, forget the infinity mark. Find a bright star, zoom in using Live View, switch to manual focus, and make that star as small as possible. It’s the single skill that will improve your night images more than any new camera or lens.
This structure follows the tutorial-style format that tends to perform well for photography blogs while staying personal, practical, and easy to read. It also matches your conversational, experience-led writing style rather than sounding like a technical manual.